Check out, check in, or discard changes to files in a library
This article will show you how to check out, check in, or discard changes to files in an intranet library.
If you want to make changes to a file on a site and you want to make sure no one else can edit it, check out the file. When you have the file checked out, you can edit it online or offline, and save it—multiple times, if necessary.

When you finish editing and check the file back into the library, other people can see your changes and edit the file, if they have permission. And, if you decide not to make or keep any changes in the file, you can simply discard your checkout so you don’t affect version history.
Tip If you want to edit an Office document at the same time as other people (also called co-authoring), don’t check out the document. Just open it and edit it. We recommend turning on versioning for the library first, though, just in case someone makes a mistake later and you need to restore an earlier version of the document. For more information about co-authoring, see Document collaboration and co-authoring.
What do you want to do?
- Check out files
- Check in files
- Discard a check-out
1. Check out files
Some libraries are set up to require checkout of files. If checkout is required, you will be prompted to check out any files that you want to edit. When you are finished with the file, you need to check in or discard the checkout.
If checkout isn’t required in the library, you don’t need to check it out as long as you don’t mind letting other people edit at the same time as you.
Tip If your team plans to use co-authoring, we recommend turning on at least major versioning in the library, just in case someone makes a mistake and uploads a document of the same name in a library where everyone is co-authoring. This way, if you lose changes, you can restore a previous version of the document.
1. Go to the library where your file is saved. (If you’re looking at a view of the library on another page, you may have to click the title of the library first. For example, you may have to click Documents first to go to the Documents library.)
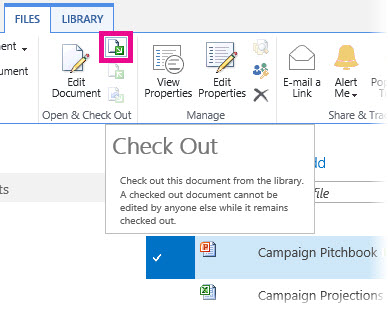
2. Select the file, or files, that you want to check out, and then click Files > Check Out
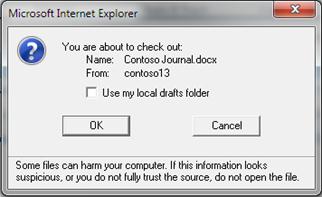
3. A message box opens, reminding you that you are about to check out a file. If you want to save it in the folder where you save your local SharePoint drafts, select Use my local drafts folder. Otherwise, don’t check the box.
Note
-
If you select two or more files for checkout, you don’t have the option to save them to a local drafts folder.
-
Checking the Use my local drafts folder box lets you take the file offline and makes the file easier to find on your computer, if you need to open it later while you are not connected to a network. Working on a file while online offers file protection advantages. If you don’t need to work offline, you might prefer to work online.
-
When the file is checked out, the icon next to the file name is partially covered by a green, downward-pointing arrow
 . This tells you, or anyone else, that the file is checked out. If you point to the icon of any checked-out file, you can see the name of the document and the name of the person who has it checked out.
2. Check in files
Your files, and any changes you make to them, will not be available to your colleagues until you check the files back into your library.
-
Go to the library where your file is saved. (If you’re looking at a view of the library on another page, you may have to click the title of the library first. For example, you may have to click Documents first to go to the Documents library.)
-
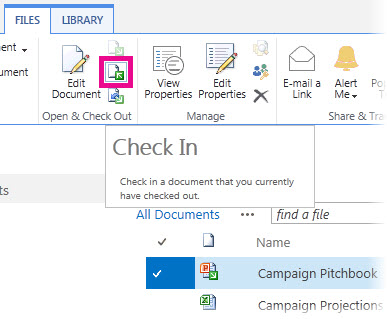
Select the file, or files, that you want to check in, and then click Files > Check In.
3. If you want to do an interim check-in so you can continue working on the file, select Yes in the Retain Check Out area. Otherwise, leave No selected.
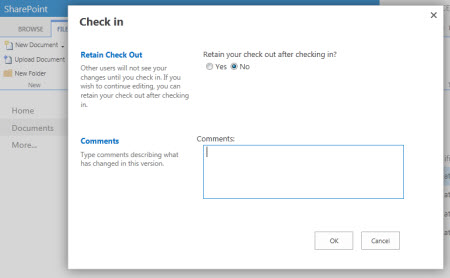
4. In the Comments area, add a comment that describes the changes you made. This step is optional but recommended as a best practice. Check-in comments are especially helpful when several people work on a file. Moreover, if versions are being tracked in your organization, the comment becomes part of the version history, which may be important to you in the future, if you need to restore to an earlier version of the file.
5. Click OK. The green arrow disappears from the file icon when the file is checked back in.
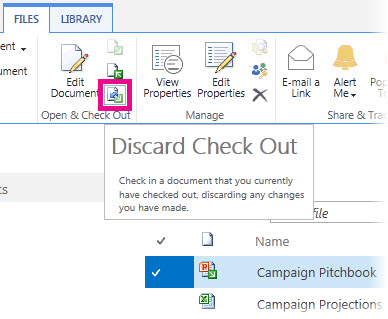
3. Discard a check-out
If you check out a file and don’t make changes to it, or you make changes that you don’t want to keep, you can simply discard the checkout, rather than saving the file. If your organization tracks versions, a new version is created each time you check a file back into the library. By discarding the checkout, you can avoid making new versions when you haven’t made any changes to the file.
-
Go to the library where your file is saved. (If you’re looking at a view of the library on another page, you may have to click the title of the library first. For example, you may have to click Documents first to go to the Documents library.)
-
Select the file, or files, that you want to discard changes for, and then click Files > Discard Checkout.
3. Click OK to finish discarding the checkout. The green arrow disappears from the file icon when the file is checked back in.